找到
12
篇与
Typecho
相关的结果
- 第 2 页
-
 AnyDesk v4.2.3 免费小巧较流畅的远程利器 AnyDesk是一款号称速度最快的免费远程连接/远程桌面控制软件,据说是前 TeamViewer 开发小组人员自立门户的产品,它拥有先进的视频压缩技术 DeskRT, 可轻松穿透防火墙/路由器,实测在电信、移动的跨网宽带环境下,速度确实要比 TeamViewer 和 QQ 流畅。虽然目前软件为Beta版,但潜力巨大…… 8.jpg图片 现如今网络环境越来越复杂,防火墙、路由器、宽带提供商等各种因素常常会导致很多「直连」的远程控制软件(如微软的 Remote Desktop) 操作缓慢甚至是连接错误。而 AnyDesk 给人的印象是速度极快、反应流畅迅速,比起前辈 TeamViewer 有过之而无不及,而且它体积还极为小巧。 AnyDesk2.0.jpg图片 AnyDesk2.0-1.jpg图片 AnyDesk 为了解决远程桌面连接速度慢的问题,使用了名为 DeskRT 的底层技术,内置了先进的视频解码器,使得在复杂的网络坏境下依然能让用户体验到流畅的远程桌面控制。 AnyDesk 支持声音传输、支持画质设置、屏幕截图,重点还支持与远程电脑同步剪贴板!不仅是文字,即使是文件或文件夹,都能直接复制/粘贴到另一台电脑去,这点非常实用!功能还算比较丰富。 另外,AnyDesk 既可以以绿色软件的方式运行,也可以安装到系统上实现开机启动、无人干预的情况下接受控制等。总的来说,AnyDesk 原生简体中文、原生绿色免费、原生单文件、体积小巧,但功能却很实用,使用也足够简单,整体速度较为流畅,应该可以满足很多人对远程控制的需求。 新版变化 2018.09.07 v4.2.3 https://download.anydesk.com/changelog.txt 下载地址:https://anydesk.com/platforms/windows
 -
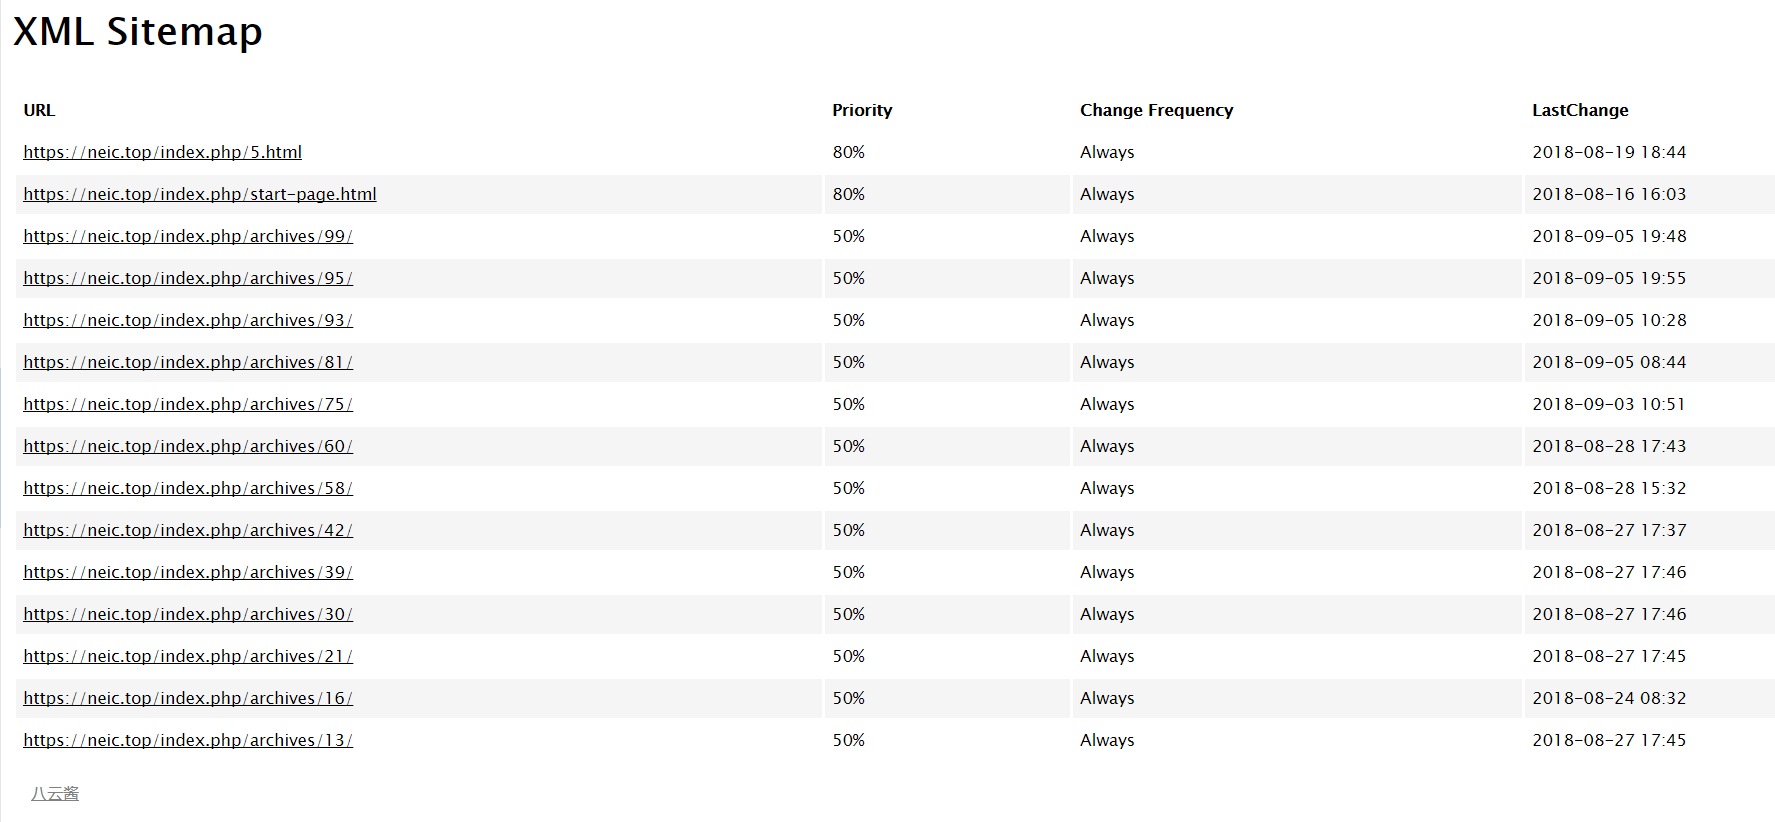
 Typecho生成sitemap.xml插件 玩博客的都知道一个博客站点拥有sitemap.xml(站点地图)对于搜索引擎的收录是非常有意义的,虽然目前搜索引擎都宣称可以不需要站点地图就可以自动识别收录,但是相对来说站点地图效率上更好一些,其实心理作用多一些了。 今天就给大家推荐一个 Typecho 下自动生成sitemap.xml的插件,是由【八云酱】开发的。 首先在GitHub上下载最新版本: Ty sitemap图片 上传插件到Typecho安装目录下/usr/plugins,插件文件夹请务必保存为Sitemap(别改就可以)。上传完成在后台启用即可,访问你博客地址/sitemap.xml就可以查看到具体效果。 1111.PNG图片 感觉这个插件超级的简单,相对于 WordPress 上的sitemap插件来说真的是简单了很多,但是对于小巧精悍著称的 Typecho 来说基本上是完全够用了。 注意:备注一点,有可能出现 404 的问题。 网站如果没有地址重写的话,访问的地址应该是"www.xxxx.com/index.php/sitemap.xml",而不是"www.xxxx.com/sitemap.xml"。 我不知道为什么服务器重写一直配置不好,所以这个插件也一直出错。后来学着写了一段时间的插件后回过来看代码,发现是通过添加路由实现,访问的时候就需要向"index.php"后面传递。 当然地址重写后就不需要了。
 -
 typecho模板常用代码 站点动态标题 <?php $this->archiveTitle(array( 'category'=>_t('分类 %s 下的文章'), 'search'=>_t('包含关键字 %s 的文章'), 'tag' =>_t('标签 %s 下的文章'), 'author'=>_t('%s 的主页') ), '', ' - '); ?> 站点地址,名称与描述 <?php $this->options->siteUrl(); ?>//站点地址 <?php $this->options->title(); ?>//名称 <?php $this->options->description() ?>//描述 PHP index.php文章循环输出 <?php if ($this->have()): ?>//判断文章存在与否 <?php while($this->next()): ?>//开始循环 <a href="<?php $this->permalink() ?>"><?php $this->title() ?></a>//文章标题和超链接 <a href="<?php $this->author->permalink(); ?>"><?php $this->author(); ?></a>//作者名称和超链接 <?php $this->date('F j, Y'); ?>//文章发布时间 <?php $this->category(','); ?>//文章分类 <?php $this->commentsNum('%d Comments'); ?>//评论数量 <?php $this->content('Continue Reading...'); ?>//阅读全文more语法截取缩略内容(可改为<?php $this->excerpt(140,'....'); ?>自动截取前140个字符,根据需要也可以改成 <?php $this->summary(); ?新版功能,自动输出内容中第一个块级元素中的内容>) <?php endwhile; ?>//循环结束 <?php else: ?>暂无与之相关文章<?php endif; ?>//判断结束 翻页代码 <?php $this->pageNav('上一页', '下一页', '5', '……'); ?>//显示多个页码的 <?php $this->pageLink('下一页','next'); ?> <?php $this->pageLink('上一页'); ?>//只显示上一页下一页 PHP 详见:Typecho 自定义分页样式 页码显示 当前页码:<?php if($this->_currentPage>1) echo $this->_currentPage; else echo 1;?> 总页码:<?php echo ceil($this->getTotal() / $this->parameter->pageSize); ?> PHP 详见:typecho当前页码和总页码的完美实现方式 文章全文显示 <?php $this->content(); ?> PHP 登陆判断 <?php if($this->user->hasLogin()):?> 登陆才可以看到这里的内容 <?php endif;?> 文章作者名称与主页地址 <a href="<?php $this->author->permalink(); ?>"><?php $this->author(); ?></a> 文章最后编辑时间 <?php echo gmdate('Y-m-d H:i', $this->modified + Typecho_Widget::widget('Widget_Options')->timezone); ?> 当前文章id <?php $this->cid(); ?> 文章中的上一篇和下一篇 上一篇: <?php $this->thePrev('%s','没有了'); ?> 下一篇: <?php $this->theNext('%s','没有了'); ?> PHP 详见:TE获取上一篇/下一篇的链接 文章标签 <?php $this->tags(', ', true, 'none'); ?> 说明:(', ', true, 'none')第一个单引号间的逗号代表标签与标签的间隔用逗号隔开,true是标签以超链接形式输出,none为该文章没有标签时显示的提示信息。 用户昵称 <?php $this->user->screenName(); ?> 后台地址与登陆地址 <?php $this->options->adminUrl(); ?>//后台地址 <?php $this->options->adminUrl('login.php'); ?>//登陆地址 文章rss和评论rss <a href="<?php $this->options->feedUrl(); ?>"><?php _e('文章 RSS'); ?></a> <a href="<?php $this->options->commentsFeedUrl(); ?>"><?php _e('评论 RSS'); ?></a> 搜索代码 <form method="post"> <p><input type="text" name="s" class="text" autofocus /></p> <p><button type="submit" class="submit"><?php _e('搜索'); ?></button></p></form> 分类描述 <?php echo $this->getDescription(); ?> 随机标签云 <?php $this->widget('Widget_Metas_Tag_Cloud', 'ignoreZeroCount=1&limit=30')->to($tags); ?> <ul class="tags-list"> <?php while($tags->next()): ?> <li><a style="color: rgb(<?php echo(rand(0, 255)); ?>, <?php echo(rand(0,255)); ?>, <?php echo(rand(0, 255)); ?>)" href="<?php $tags->permalink(); ?>" title='<?php $tags->name(); ?>'><?php $tags->name(); ?></a></li> <?php endwhile; ?> </ul> 标签相关文章 <?php $this->related(5)->to($relatedPosts); ?> <ul> <?php while ($relatedPosts->next()): ?> <li><a href="<?php $relatedPosts->permalink(); ?>" title="<?php $relatedPosts->title(); ?>"><?php $relatedPosts->title(); ?></a></li> <?php endwhile; ?> </ul> 调用某分类文章,pageSize是数量,mid是分类号: <?php $this->widget('Widget_Archive@index', 'pageSize=6&type=category', 'mid=47′) ->parse('<li><a href="{permalink}">{title}</a></li>'); ?> 首行缩进问题,加入css实现 .post-content p{ text-indent: 2em; /*em是相对单位,2em即现在一个字大小的两倍*/ } 全部标签列表,按照MID排序 <?php $this->widget('Widget_Metas_Tag_Cloud') ->to($taglist); ?><?php while($taglist->next()): ?>//循环输出 <a href="<?php $taglist->permalink(); ?>" title="<?php $taglist->name(); ?>"><?php $taglist->name(); ?> </a> <?php endwhile; ?>//循环结束 最新文章 <?php $this->widget('Widget_Contents_Post_Recent')->to($post); ?> <?php while($post->next()): ?> <a href=”<?php $post->permalink(); ?>” title=”<?php $post->title(); ?>”> <?php $post->title(25, '…'); ?></a> <?php endwhile; ?> 判断为当前页的第几篇文章,并单独输出内容 <?php if ($this->sequence == 0): ?> //需要的插入 <?php endif; ?> 神奇的is语法 <?php if ($this->is('post')) : ?> 这里就是内容了 <?php endif; ?> typecho可以使用is语法判断很多东西,比如 $this->is('index'); $this->is('archive'); $this->is('single'); $this->is('page'); $this->is('post'); $this->is('category'); $this->is('tag'); 甚至是 $this->is('category', 'default'); $this->is('page', 'start'); $this->is('post', 1);


